Friday, June 26, 2015

Spinach Pulao / Spinach Rice

About the Recipe:
Spinach is one of wonderful green-leafy vegetable often recognized as one of the functional foods for its wholesome nutritional, antioxidants and anti-cancer composition. Its tender, crispy, dark-green leaves are one of the favorite ingredients of chefs all around the planet. Now, let us get to know how to prepare a simple and healthy spinach pulao / Rice


Preparation Time: 15 mins (excluding soaking time)
Cook Time: 10-15 mins
Serves: 2

Ingredients needed:
1.Boiled Rice: 2 Cups
2.Spinach: 1 Bunch
3.Onion: 1 Medium
4.Green Peas: a handful
5.Kitchen King Masala/Garam Masala Powder: 1 tsp
6.Salt: as required
7.Ghee: 1 tsp (optional)

To Grind:
1.Tomato: 1 Medium
2.Ginger: 1 inch piece
3.Garlic: 2-3 nos
4.Green Chilly: 1
4.Coconut: 2 tsp

For the seasoning:
1.Cardamom: 2 nos
2.Cloves: 2 nos
3.Cinnamon: ½ inch piece
4.Bay leaf: 1
5.Cashew nuts: a few
5.Cumin Seeds: 1 tsp


Preparation:
1.Wash and chop spinach finely
2.Chop Onions lengthwise
3.Gring the ingredients mentioned under “To Grind” section with a little water to a fine paste


Method:
1.Heat Oil in a pan, add the ingredients mentioned under the “seasoning” section one by one
2.Then add chopped onions and saute it till it becomes soft
3.Now add the grounded paste and cook till it becomes a dry paste
4.Add the chopped spinach and cook till all the moisture evaporates.Keep the flame in medium till the spinach cooks the turn the flame to high so that the moisture evaporates easily.
5.Then add kitchen king masala, required salt and fresh peas
6.Finally add the boiled rice and switch off the flame. Mix everything gently

7.The Spinach Pulao is ready to be served with tomato raitha


Note:
1. I have used cooked basmati rice. You can also use the normal cooked rice too
2.It is very important to cook the spinach well till it leaves all of its moisture before adding the rice to it

Tuesday, June 9, 2015

Horse gram Idly/ Horse gram Dosa - Kollu Idly/ Kollu Dosa

About the recipe:
Horse gram may not be inviting by the sound of it but its qualities are undeniably wonderful. Horse gram has the highest calcium content among pulses and is one of the richest vegetarian sources of protein, low in fat and high in carbohydrate content, low in lipid and sodium content, and its slow digestible starch make ideal for diabetic and obesity patients.


Translations:
English: Horse Gram
Tamil: Kollu
Hindi: Kulthi / Hulthi
Telugu: Ulavalu
Now, we will get to know how to prepare a simple recipe using horse gram


Ingredients required:
1.  Horse Gram: 2/3 Cup*
2.  Idly Rice: 2 Cup
3.   Urad Dal: ¼ Cup
4.  Methi seeds/ Fenugreek seeds: 1 tsp
5.  Salt: as required

* 1 Cup: 200 gms


Preparation:
1.Wash and soak all the ingredients separately (except salt) for 5 to 6 hours
2.Then grind each soaked ingredient separately to a smooth paste and mix them together in a large bowl
3.The batter should not be very thin or very thick. It should have a pouring consistency (similar to the normal idly dosa batter)
3.Add salt and mix the batter well , leave it for fermentation


Method:
1.  After fermentation mix the batter well and check for salt
2.  For making idly, grease the idly plate with oil and fill in each mould with a scoop of batter
3.  Steam for 7 to 20 minutes
4.  Soft and spongy Horse gram idlies are ready to be served
5.  For making dosas, heat a dosa tawa and pour a ladle full of batter and spread it ( same as the normal dosas-mix little water for making dosas if the batter is thick)
5.  Drizzle a spoon of oil and let it cook
6.  Flip the dosa to the other side and serve the hot crispy dosas

Note:
1.  It is important to grind each ingredient separately
2.  Grind the Horse gram first to a smooth paste, then urad dala nd finally the idly rice
3.  The fermentation time depends upon your climate
4.  The given quantity will make around 30 medium idlis , you can double the quantity if you want to make more idlis


Wednesday, May 27, 2015

Black-Eyed Peas Rice/ Thattapayir Sadham

About the Recipe:
Another simple and easy one pot meal which is prepared using Black-Eyed Peas. It is called Thattapayir Sadham/ Black-Eyed Peas Rice. This is can be accompanied by any raitha or pickle or just papad. Now, let us get to know how to prepare this rice


Preparation Time: 10 mins (excluding soaking time)
Cook Time: 10-15 mins
Serves: 2

Ingredients needed:
Rice: 1 Cup
Black-Eyed Peas: 1 Cup
Small Onions/ Pearl Onions : 15-20 nos
Tomato: 1
Ginger: 1 inch piece
Garlic: 2-3 nos
Green Chilly: 2 nos
Dry Red Chilly: 1-2 (optional)
Turmeric Powder: ½  tsp
Water: 3 Cups
Salt: as required
Oil: 1 tbsp
Mustard seeds: 1 tsp
Cumin seeds: 2 tsp
Curry leaves: a few
Coriander leaves: a few


Preparation:
1. Wash and soak Black-Eyed Peas for two hours. Soaking the peas enables faster cooking
2. After soaking discard the water and pressure cook the peas with 2 – 3 cups of water for 5 to 6 whistles or until soft
3. After the Black-Eyed Peas is cooked drain the water into a bowl using a colander.You can use this water for cooking the rice
4. Chop onions, green chilly, tomato, ginger and garlic


Method:
1. In a pressure cooker, heat a tsp oil oil and add mustard seeds
2. After the mustard seeds splutter, add the cumin seeds
3. Then add chopped onions, garlic, ginger and green chillies
4. Add a little salt and cook till the onions are soft
5. Now, add the chopped tomatoes and turmeric powder, cook till soft            
6. Finally add the cooked Black-Eyed Peas , water – 3 Cups( measure the water drained from cooking the peas and if required add plain water also)and check for salt
7. Add chopped curry leaves, coriander leaves. Close the lid and cook for 3 whistles in medium flame
8. After the pressure completely subsides, open the cooker.
9. Serve the hot Black-Eyed Peas Rice (with a spoon of ghee on it if needed)  along with any raitha

Note:
1. Adding red chilles are optional. If you want the rice to be hot , you can add them
2. Add water only for the rice alone with cooking it. Do not add extra water for the Black-Eyed Peas , since it has already been cooked
3. Make sure the peas is well cooked before you add into cooker along with the rice. Do not try to cook with the rice
4. Adding small onions / pearl onions will enhance the taste of the rice. If you do not have pearl onions, you can add the big onions


Friday, May 22, 2015

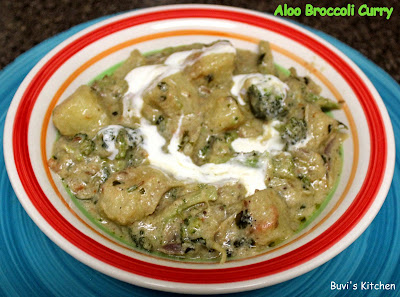
Aloo Broccoli Curry

About the recipe:
Another simple recipe using Broccoli. This is a rich and healthy gravy which goes well with Chapati, Phulka, Naan and Poori. This is another way of incorporating Broccoli in our diet. Let us know know how to prepare this rich creamy gravy with very few ingredients


Preparation Time: 15 mins
Cook Time: 10 mins
Serves: 2-3

Ingredients needed:
Broccoli: a bunch
Potato: 2 nos
Onion: 1
Tomato: 1
Kasuri Methi/ Dry fenugreek leaves: 1 tsp
Fresh Cream: 3 tsp
Cumin Seeds: ½ tsp
Salt: as required
Oil: 1 tbsp
Water: as required

To Grind:
Coconut: 1 tbsp
Fried Gram/ pottukadalai: 2 tsp
Green Chilly: 1
Dry Red Chilly: 2
Ginger: 1 inch piece
Garlic: 2 nos
Cinnamon:  ¼ inch piece
Cardamom: 2 nos
Cloves: 2 nos
Fennel seeds: ½ tsp

pic-1

pic-2

pic-3

pic-4

pic-5

pic-6

Preparation:
1. Cut the broccoli in to medium sized florets and wash them thoroughly in water
2. Pressure the potato, then remove the skin and cut them into medium sized pieces
3. Grind all the ingredients under the “to grind” section using a little water into a fine paste
4. Slice onion lengthwise and chop the tomato finely


Method:
1. Heat a tsp of in a pan and fry the broccoli florets till you see light brown color (as seen in the picture pic-5) and keep it aside
2. In the same pan, heat a tsp of oil and fry the boiled and cubed potatoes till you see light brown color (as seen in the picture pic-6) and keep it aside
3. In another kadai, heat oil and add cumin seeds
4. Then add onion and saute well till they are transparent
5. Now add the chopped tomato and cook well
6. Add the grounded paste and cook for a few minutes
7. Add a little water add drop in the fried potatoes first, close the kadai with a lid and cook for a few minutes
8. Then add the fried broccoli, required salt and water, again close and cook for few minutes
9. Finally crush and add kasuri methi and fresh cream
10. Garnish with coriander leaves and serve with chapti, phulka, naan or poori


Note:
1. Frying the potato is optional
2. But frying broccoli is important, since frying it ensures the flowers does not break or become mushy when dropped into the gravy
3. You can adjust the green Chilly as per your taste

Check out my Other Broccoli recipes


Wednesday, May 20, 2015

Dal Rice/Spicy Dal/Arisi Paruppu Sadham

About the Recipe:
This is a very simple dish. It is often called as Arisi Paruppu Sadham. You can prepare this dish when u run out of vegetables at home or when u need to prepare quick and that too yummy. This is can be accompanied by any raitha or potato curry or pickle or just papad. Now, let us get to know how to prepare this Dal Rice/ Arisi Paruppu Sadham


Preparation Time: 10 mins (excluding soaking time)
Cook Time: 15-20 mins
Serves: 2

Ingredients needed:
Rice: 1Cup
Toor Dal: ¼  Cup
Channa Dal: ½ Cup
Onion: 2
Tomato: 1
Ginger: 1 inch piece
Garlic: 4-5 nos
Dry Red Chilly: 5-6
Sambar Powder: 1 tsp (optional)
Turmeric Powder: ½  tsp
Water: 3 Cups
Salt: as required
Oil: 1 tbsp
Mustard seeds: 1 tsp
Cumin seeds: 2 tsp
Curry leaves: a few
Coriander leaves: a few


Preparation:
1. Wash and soak rice, toor dal and channa Dal with 3 cups of water for atleast 20 minutes
2. Slice onions and garlic lengthwise
3. Chop tomato and ginger finely


Method:
1. In a pressure cooker, heat a tsp oil oil and add mustard seeds
2. After the mustard seeds splutter, add the cumin seeds and dry red chillies
3. Then add sliced onions, garlic and ginger
4. Add a little salt and cook till the onions are soft
5. Now, add the chopped tomatoes and turmeric powder, sambar powder and cook till soft
6. Finally add the soaked rice and Dal along with water and check for salt
7. Add chopped curry leaves, coriander leaves. Close the lid and cook for 3 whistles in medium flame
8. After the pressure completely subsides, open the cooker.
9. Serve the hot Dal Rice (with a spoon of ghee on it if needed)  along with any raitha

Note:
1. If your dry red chillies are not hot enough, you can add the sambar powder.else you can skip ot
2. Add water only for the rice alone with cooking it. Do not add extra water for the Dal
3. Adding small onions will enhance the taste of the rice. So if you have small onions/pearl onions go ahead and add them

Do not forget to Hit +1, if you like the recipe :) :)

Monday, May 18, 2015

Eggless Strawberry Muffins

About the recipe:
A tasty treat for your tea time sweet cravings. Make these yummy and delicious "Strawberry Muffins " at your home and enjoy them at your leisure


Preparation time: 10 mins
Cook time: 30-35 mins
Yields: 10-12 Muffins

Ingredients needed:
All purpose flour/Maida: 2 Cups*
Sugar: ¾ Cup
Yogurt/Curd: 1 Cup
Milk: ½ Cup
Oil: ½ Cup
Butter:  1 tbsp  (optional)
Baking Powder: 1 ½ tsp
Baking Soda: ½ tsp
Vanilla extract: 1 tsp
Strawberry: 10-15 nos
*1Cup=200 gms


Preparation:
1. Wash and chop strawberries into small pieces discarding the leaves
2. Dust the chopped strawberries using flour so that when we add into the batter it won’t stick together
3. Preheat the oven to 180°C/350°F
4. Line the cupcake moulds with cupcake papers


Method:
1. Sift All purpose flour, baking powder and baking soda at least twice , so that everything will be mixed well and keep it aside
2. In another mixing bowl, add butter, sugar, yogurt and mix well without lumps
3. Then,add oil, vanilla essence and blend them well
4. Now, add the all purpose flour little by little and mix everything gently. Do not over mmix or beat it
5. Finally add the strawberries and mix once
6. Scoop the batter in each of the mould to ¾th of the cup. Do not fill in completely
7. Put the baking tray inside the oven and bake it for 30 to 35 mins at 180°C / 350° F till you nice golden brown color on the top
8. After 15-20 mins check by inserting a knife or a tooth pick inside the muffin, if it comes out clean then it means it has been baked well
9. Allow it to cool down by placing the cake in a cooling tray
10. Enjoy the muffins with a hot cup of tea or coffee


Do not forget to HIt +1, if you like the recipe :) :)